Showing posts with label Glitter. Show all posts

Thursday, 27 September 2012

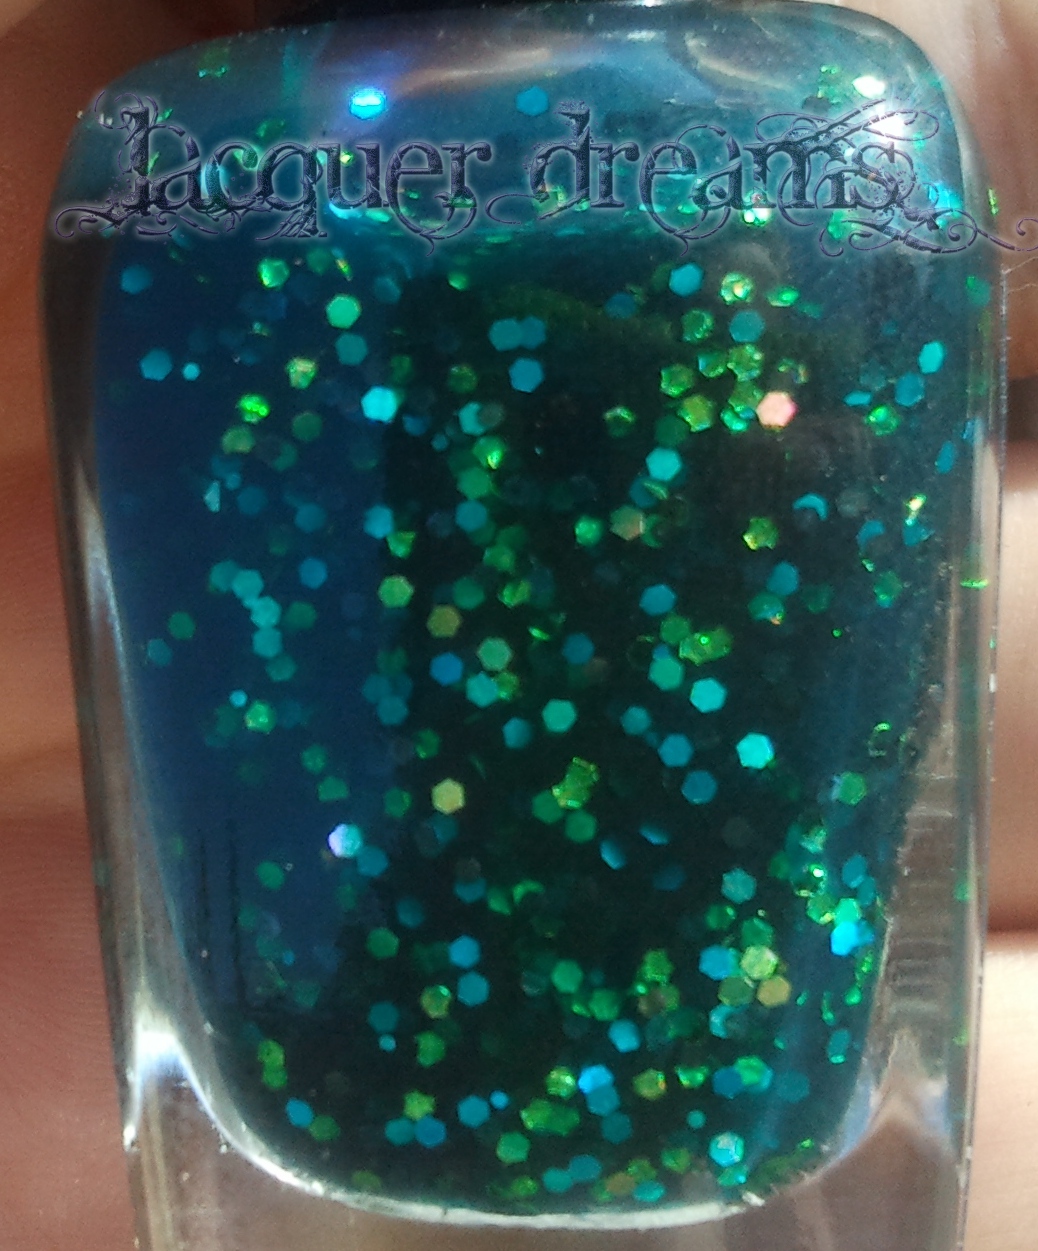
Gloss n' Sparkle Goblins Grave Swatches and Review

 Hey there! Another Gloss n' Sparkle today, this one, I struggle for words. It's amazing. Just superb.


Goblins Grave. Dark green jelly base packed with green and some holo glitters. We all know the glitter + green = Bec likey.

Like all other of my Gn'S polishes, this applied perfectly. I have never had to fish the glitter out of any of these, and have had no problems at all. I used 3 coats here,and it does look a bit sheer, but it is a jelly base so that's ok. I like it! It dried nice and quick, but I did top it off with 2 coats of SV to smooth it out.

My pictures cannot do this one justice. It is really, really, REALLY awesome. I was constantly staring at my hands when I wore this.

What do you think about Goblins Grave?

Until Next Time

<3 Bec


Tuesday, 25 September 2012

Grey Layering with China Glaze!

I am on such a layering kick lately. I love the options it leaves open for me to play with. This one, however is totally different to what I've been doing lately, and is dark and autumn-y.


I used another of my untrieds, China Glaze Recycle, and awesome grey creme. I now have 2 greys, so I'm a bit picky with them. I used 3 coats, and then over the top on my two middle fingers I put on a coat of Some Like It Haute, another China Glaze. Topped it off with a coat of SV and voila! It's an awesome combo, they match together so well!

I have more layering to show you in the coming days, so stay tuned!

Until Next Time,

<3 Bec

Saturday, 15 September 2012

Gloss n' Sparkle Unicorn Droppings Swatches and Review

Hey hey! Sorry for my slight absence of late, it's been a hectic week, and to cap it all off, I've gone and gotten sick! Anywhoo, today I have another of my Gloss n' Sparkle reviews for you, and I KNOW that this one is going to be a best seller! And, it's also totally appropriate because I have two birthday shindigs this weekends (Happy Birthday Cienna and Louise!) and it's such a party colour!


HOW COOL IS THAT?! It's a sheer, but buildable white white base packed with red, orange, yellow, blue, green and purple hex glitter. But I was surprised to see that it's also packed with holographic shimmer! Whaaaaaaat?! I struggled to capture it, because I struggled to get any sunlight, but it's definitely there!

I mentioned that this was sheer, but buildable. And it is. This is 3 coats, with 2 coats of SV (I didn't need the 2nd coat, I just did it because I prefer 2). It dried quickly, but I suggest waiting until each coat is dry before doing the next, because the glitter may move. I didn't have any trouble with the glitter application either, it was easy.

My favourite thing though, is the name. This is exactly what Unicorn poop should look like. It's bright, majestical and fun.

Gloss n' Sparkle polishes retail for $10AUD each (13ml jars), and are all 3-free. She currently doesn't ship overseas, but is working on it!

What do you think of Unicorn Droppings?

Until Next Time!

<3 Bec

*products in this post were sent for review, and this in no way affects my opinion*

Wednesday, 5 September 2012

Gloss n' Sparkle Cotinga Swatches and Review

Hey hey! Today I have the first of 6 polishes to show you from Australian Indie brand Gloss n' Sparkle.

Angela makes some pretty amazing glitter polishes, some very unique shades in her shop! The one I have for you today, Cotinga, is a real stunner!

According to the Etsy description, Cotinga is:

"A glitter top coat in a clear suspension base, with blue, aqua, teal, turquoise, lavender, purple and silver hex and shredded glitter"

And that sums it up pretty nicely! It's an amazing peacock-y glitter mix, it is super sparkly and has an awesome mix of glitters. And no bar glitters! (words cannot explain how much I dislike bar glitter!)


So for my swatch, I wanted the perfect colour for it. I was reaching for china Glaze For Audrey, but I spied Turned Up Turquoise (I love it so much) first and knew it would work. I started with 2 coats:


Yes, I know my naked nails are rather stained... but lets focus on the sparkles shall we? ;D

After TUT was dry, I painted a stripe of Cotinga covering the tips, and one coat on the accent nail. I left that to dry and then added another full coat over every nail. So basically, 2 coats accent, 1.5 coats tipped nails.


This is all finished off with 2 coats of Seche Vite, just to make sure everything is smooth. I love this so much, the combination of the polishes, but moreso that glitter alone, it is so, so awesome.

The formula was good, on the thick side, but definitely manageable. And it didn't take too long to dry, and I didn't have to 'fish' any of the glitter out or dab it on.

Unfortunately, Gloss n' Sparkle do not ship internationally at the moment, but it is something Angela is working on!

What do you think? Would you wear Cotinga?

Until Next Time!

<3 Bec


*the polishes in this post were provided to me for review. this in no way affected my honest opinion*

Saturday, 14 July 2012

BFF- Girly and a glitter review!

Hey hey! Back again for another installment of the BFF Challenge, and it's Thia's second choice, girly! Now, I'm not girly, we know that. Quite the opposite in fact. But I liked the challenge this gave me to explore that side of me!

I thought this would be an awesome mani to use another of the KKCenterHK products I was sent! But it wasn't without its drama! See, I was using the other glitter I got (N Nail LB100) and my cat Pepper jumped up on the desk. Next thing I knew...


Glitter EVERYWHERE. So before I was able to finish my first attempt at this mani, i was covered in glitter (as were the table, chair, floor and cat) so it got stuck in my wet unfinished nails while cleaning it! Luckily I managed to save the glitter, and I gave it another shot today. The results..


Adorable! I used 3 coats of China Glaze Something Sweet, which didn't photograph properly, it's a bit pinker in person. Then, one nail at a time, I put a layer of top coat on, placed the individual pieces of the glitter on and topcoated again to seal and finished off my adding a black tip with a nail art pen.

I really love this glitter. It's medium sized holo hex silver glitter, and OMG does it sparkle! I like sparkles ;D

So I tried to be girly, and now have a sparkly cat. Success!

Until Next Time

<3 Bec

My fellow challengers!


*The glitter in this post was provided to me for review by kkcenterhk. This in no way impaired my judgement and my opinions are my own and 100% honest*

Wednesday, 11 July 2012

KKCenterHK Glitter Review!

Hello Hello! Late night blogging again, it's after 2am! I have something fun to show you today, I was contacted by KKCenterHK offering some products for me to review. Of course I said yes! I love nail art and any chance I get to use it! So, I got my package yesterday, and was a bit spoilt with items, so there's going to be some awesome nail art coming soon!

Today though, I have something simple, yet gorgeous. I was still wearing my I'm With The Lifeguard mani, so this was a perfect combo to do this;

Taken Indoors

It's a gradient, using real glitter! The glitter is N Nail C-51  (click the link to see more details!) and I ADORE it! It's semi-transparent neon green hex glitter, with some iridescent/hologram glitter mixed in, as well as some neon green micro glitter. Love love love it! 


It comes in a nice sturdy, 5gram container with a screw on top, you get SO much product too! I opened both this, and my other glitter (which I will show you soon!) and they were honestly packed to the top! 

Now, for my gradient, I kinda just made it up as I went along, but it worked well, so no complaints from me! (The rest of the photos were taken in the sunlight)


How did I do it? Well, first, I gave my nails one coat each of top coat, let it dry enough to be sticky, and dipped the tip of my nail in the tub of glitter. I pressed any glitter that was standing down, and let it dry. Then, another coat of top coat and another glitter dunk. And I topped it off with another 2 coats of top coat. The glitter is nice and thin, so even if it ends up quite thick, like mine did, it's not an inconvenience!


I really loved the results of this, simple, super sparkly and very easy! What do you think?

Until Next Time,

<3 Bec

PS: I also have a promo code for 10% off! Use the code 'lacquerdreams' with your order at kkcenterhk!

*The glitter in this post was provided to me for review by kkcenterhk. This in no way impaired my judgement and my opinions are my own and 100% honest*

Thursday, 28 June 2012

Rainbow Favourites Blue & Green + a review!

 Hello hello! I know I skipped yesterdays Rainbow day, Green, but, I had an idea.

A short while ago I was contacted by FeatherGirlz, a Canadian company that specialises in AMAZING feather products. I was planning to post my review earlier, but I very suddenly had to juggle 2 courses, and a sudden move of house. So I do apologise to the girls for taking so long! I'm sorry!

The products I was sent to review are simply divine. They chose the products for me, and they picked two I would have chosen myself! I was sent the Chocolate Mousse charm, and the Off the Hook Clip in Extension (click the links to see the items!)

I really love these. The feathers are natural, soft, and beautifully coloured. We'll start with the charm.


Chocolate Mousse is a great mix of neutral/brown patterned feathers, all secured nicely on a sturdy clasp and chain. I'm actually using it as one of my keyrings! I've gotten some great compliments about it too, luckily they sent me some business cards to hand out!


And the Off the Hook Clip in extension? There are no words for how much I love this.


As you can see, there are 5 long feathers attached the the snap open/shut clip. A green, a blue, a pink, and 2 that transition between all three colours, one plain and the other with black stripes. It's a gradient on feathers, I love that!

And, how it looks in my hair; (please excuse the regrowth lol!)

  You can see the clip here, it's nice and sturdy and easy to use.
And, you can't see it under your hair! Bonus!

So, for my nails for the rainbow challenge, today is technically 'Blue' day, so I added some green to make up for yesterday, so here are my favourite blue and green;


China Glaze Towel Boy Toy and Color Club Glitter Envy. Love love love.

So, there you have it. I love the feathers, and will be purchasing from them in the future for sure!

Until Next Time,

<3 Bec

*Some of the products in this post were sent for review. This in no way has altered my views, they are my honest opinions*


Sunday, 24 June 2012

Rainbow Favourites- RED!

Hello hello! Starting my week of favourites tonight, (see here for details!) and we're starting with one of my fave colours, red. This was a hard one for me, but looking through my nail folders on my computer, I kept coming back to one photo. One polish just stands out above the rest, so much so that I actually have 2 jars of it;


China Glaze Ruby Pumps. Intense red jelly packed with red glitter. Sparkly and classy at the same time. This photo above was my first time using it, and I instantly fell in love. I used it again recently, again with black (they just look THAT good together);


I love it. If you don't have it, GET IT. I believe everyone who loves polish should own it.

Now, go check out the other girls showing off their fave reds!


Saturday, 16 June 2012

NOTD feat. China Glaze and Nubar!

Hello again! Just a quick (scheduled) post today! I wore this combo last week and adored it!


2 coats of China Glaze Ruby Pumps and 2 coats of Nubar Black Polka Dots on my thumb and ring finger. Ruby Pumps is one of my all time favourites, its so amazing!

Until Next Time,

<3 Bec

Sunday, 13 May 2012

The Whimsical Dawn Has Broken...?

Not a very creative title, but hey? Today I have an awesome layering combo for you. I recently swapped a spare bottle of Essence's The Dawn Is Broken to Maria for Revlon Whimsical. Whimsical was waiting for me in the mail box on Wednesday, so I was looking for something besides light blues to layer it over. So instead, I layered it over TDIS.


 The Dawn Is Broken

Whimsical

We all know Whimsical. Sheer (very!) pale blue with multi sized blue and pink glitters. Dupe of DL Glitter in the Air. AWESOME.  Really awesome colour.


So, the two together...


I LOVE IT! Such a cool combo! The black mirco glitter shows through, and the blue base of Whimsical gives the grey a nice tint. 

This was 1 coat TDIS and 2 coats of Whimsical.

I neeeeeed to layer this as much as possible! I got 2 more China Glazes yesterday that would both make awesome underwear for this? Also, I'd love to hear your layering combos for this!

Until next Time,

<3 Bec

Monday, 30 April 2012

Some Vampire's Love...

Hello hello! Yes, I've been lazy again but now that things have quietened down a fair bit, we're back to our regularly scheduled programming.

So, I went through my stash the other night and pulled out all the polishes I am yet to swatch and it turns out that I have 27 of them. TWENTY SEVEN D:!!! This is an all time high for me, so I need to get swatching!

So what I'll be doing is posting things in bunches :3 I have a few CG Tronicas, some Milani holos, some A Englands (omg!) and a buttload of Orlys, plus more to show you...

Today, I've got two colours from Essences Vampires Love collection, now I was really late on the ball for this collection, but I recently managed to find a few in a couple of Targets around the place. I even managed to snag an extra one for Maria, who had been lemming it hardcore, so I swapped her for Revlon Whimsical :D (that one should be arriving this week! and adding to my pile to swatch)

First up, Hunt Me If You Can. (please be warned that the following photos contain something rarely seen, my right hand. Also, I managed to break 2 nails recently so it looks bad :/)


HMIYC is a black with silver shimmer, that in the right light shines purple and green. I unfortunately was unable to capture that, but trust me, it's gorge!


I used 2 coats for this, I think if careful, you could get away with one, but my brush was a bit...wonky. It was extra bristly and harder than most brushes, so it kinda dragged the polish along with it when trying to apply it...

I saved my favourite for last ;D. This is The Dawn Is Broken, and I LOVE it! This is actually the only grey polish I own, and I picked a good one! It's a light, mousy grey creme, with black and silver microglitter. SO GOOD.


Oh that glitter...

Best thing about this polish? I am wearing ONE COAT. It does make my hands look kinda...dead, but I forgive it because I love this polish!

So, there's the first post of my Swatchathon! Now, any requests on what I should do next? Orly, CG, OPI, A England, Milani...? Let me know!

Until Next Time,

<3 Bec


Friday, 27 April 2012

Nail School Update! (Plus more!)

So I've mentioned before that I'm currently studying to get my qualifications to be a nail tech, and Tuesday night was the first night of term 2. Quarter way through it! WOO! Last term, we studied basic and deluxe mani/pedis, which I really enjoyed (and passed easily ;D), and this term we're doing acrylics. To be honest, I was a bit nervous, because I really expected to struggle with this... So after a demo in class, I called upon my favourite Client/Hairdresser Cienna, (who has supported me from day 1, and even encouraged me to apply for the course!) for a practice the night after.

Now, for my first time doing acrylics, I gotta say, I'm stoked with how I did. I took notes from the demo, but I barely needed to look at them! So after the entire process (except buffing for the last time), we took a photo (I do apologise for the bad lighting, it was 8pm!)


Not bad huh? And then, just because we can, I polished them.


That's A England Ascalon, with A England Bridal Veil as the accent nails, and it's all topped off with a franken holo topcoat I've made. They look sooooo good! Also, I have a few A Englands to show you soon, just waiting for some sun!

And, to explain why I haven't been posting much, I make and sell acrylic nail sets on etsy (chekkit out here!) and through facebook, and all of a sudden I had a HUGE amount of orders! So my week has been spent doing them, I posted the last one off this morning. And I figured I would share them with you! (not all are from actual orders, some I made for the hell of it)


So that's where I've been! I plan to get some awesome insane amounts of swatching done tomorrow so I guy show y'all some amazing things! (and start posting more!)

Until next time,

<3 Bec